Git and GitHub Part 3: Conflicts, Rebase, and Safe Recovery
A merge conflict is not Git saying that your project is broken. It is Git saying, "Two changes affect the same place and I cannot choose for you." That is a useful warning. You decide the final version; Git records the decision.
This article covers the point where Git starts to feel less like a list of commands and more like a history tool: updating a branch, resolving conflicts, rebasing safely, and recovering from ordinary mistakes.
Update your branch before asking for review
While you work on a feature branch, main can move ahead. Bring its changes into your branch before opening or updating a pull request.
First, save your current work in a commit. If it is too rough to commit, set it aside with git stash:
1git stash push -m "Half-finished newsletter edit"
2Your working directory becomes clean and the changes are stored on a shelf. After updating the branch, bring them back with:
1git stash pop
2Then fetch the latest information from GitHub:
1git fetch origin
2git fetch downloads remote commits and updates remote-tracking names such as origin/main. It does not change your current files.
From your feature branch, you now have two common options:
1git merge origin/main
2or:
1git rebase origin/main
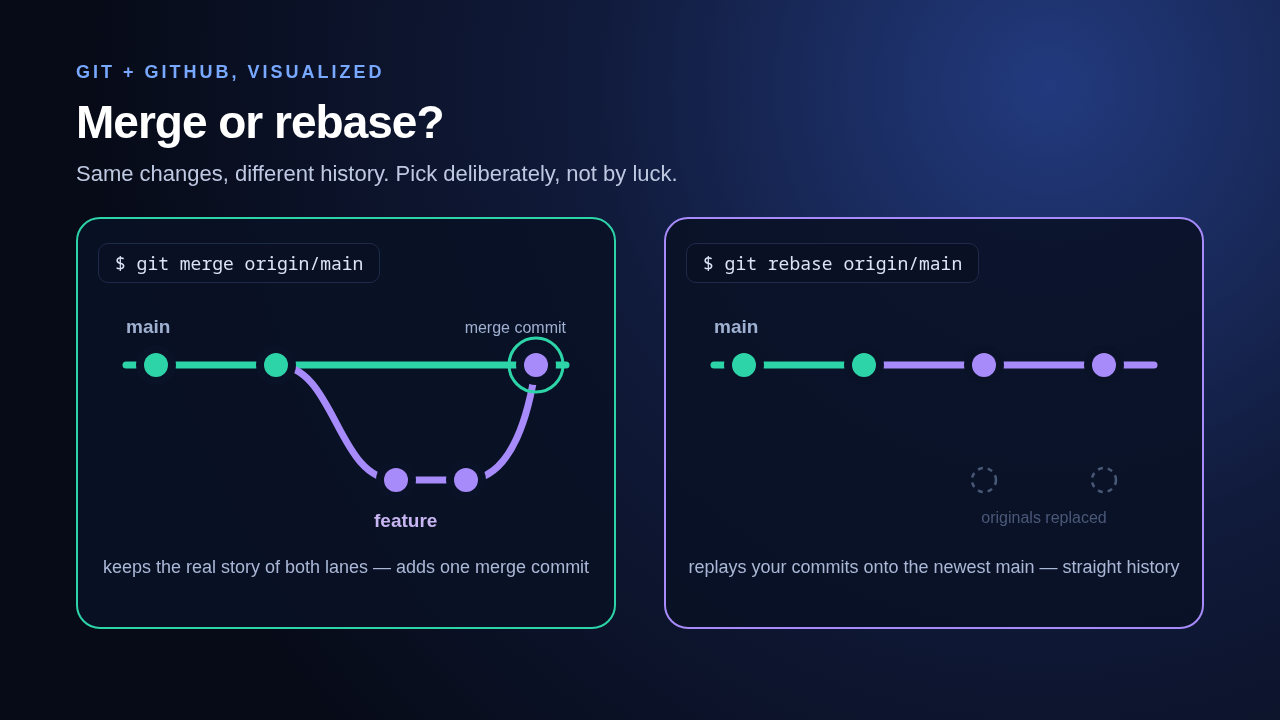
2Both incorporate the latest main changes. The difference is how the history looks.
Merge or rebase?
Merge combines two histories and creates a merge commit when a fast-forward is not possible. It does not rewrite existing commits. This is the safer default for branches other people already use.
Rebase takes your branch's commits, moves the branch base to the newer target, and replays those commits there. It creates new commit IDs for the replayed commits, producing a straight-looking history.
Use this rule while learning:
- Merge shared branches.
- Rebase your own local or personal feature branch before review, if your team prefers it.
- Do not rebase commits that teammates may already have based work on unless everyone agrees and knows how to update.
If you rebase a branch that you already pushed, the remote history no longer matches. After checking the result, update the remote branch with:
1git push --force-with-lease
2Use --force-with-lease, not --force. It refuses to overwrite the remote branch if it changed in a way you have not fetched, which helps protect a teammate's work.
Resolve a merge conflict step by step
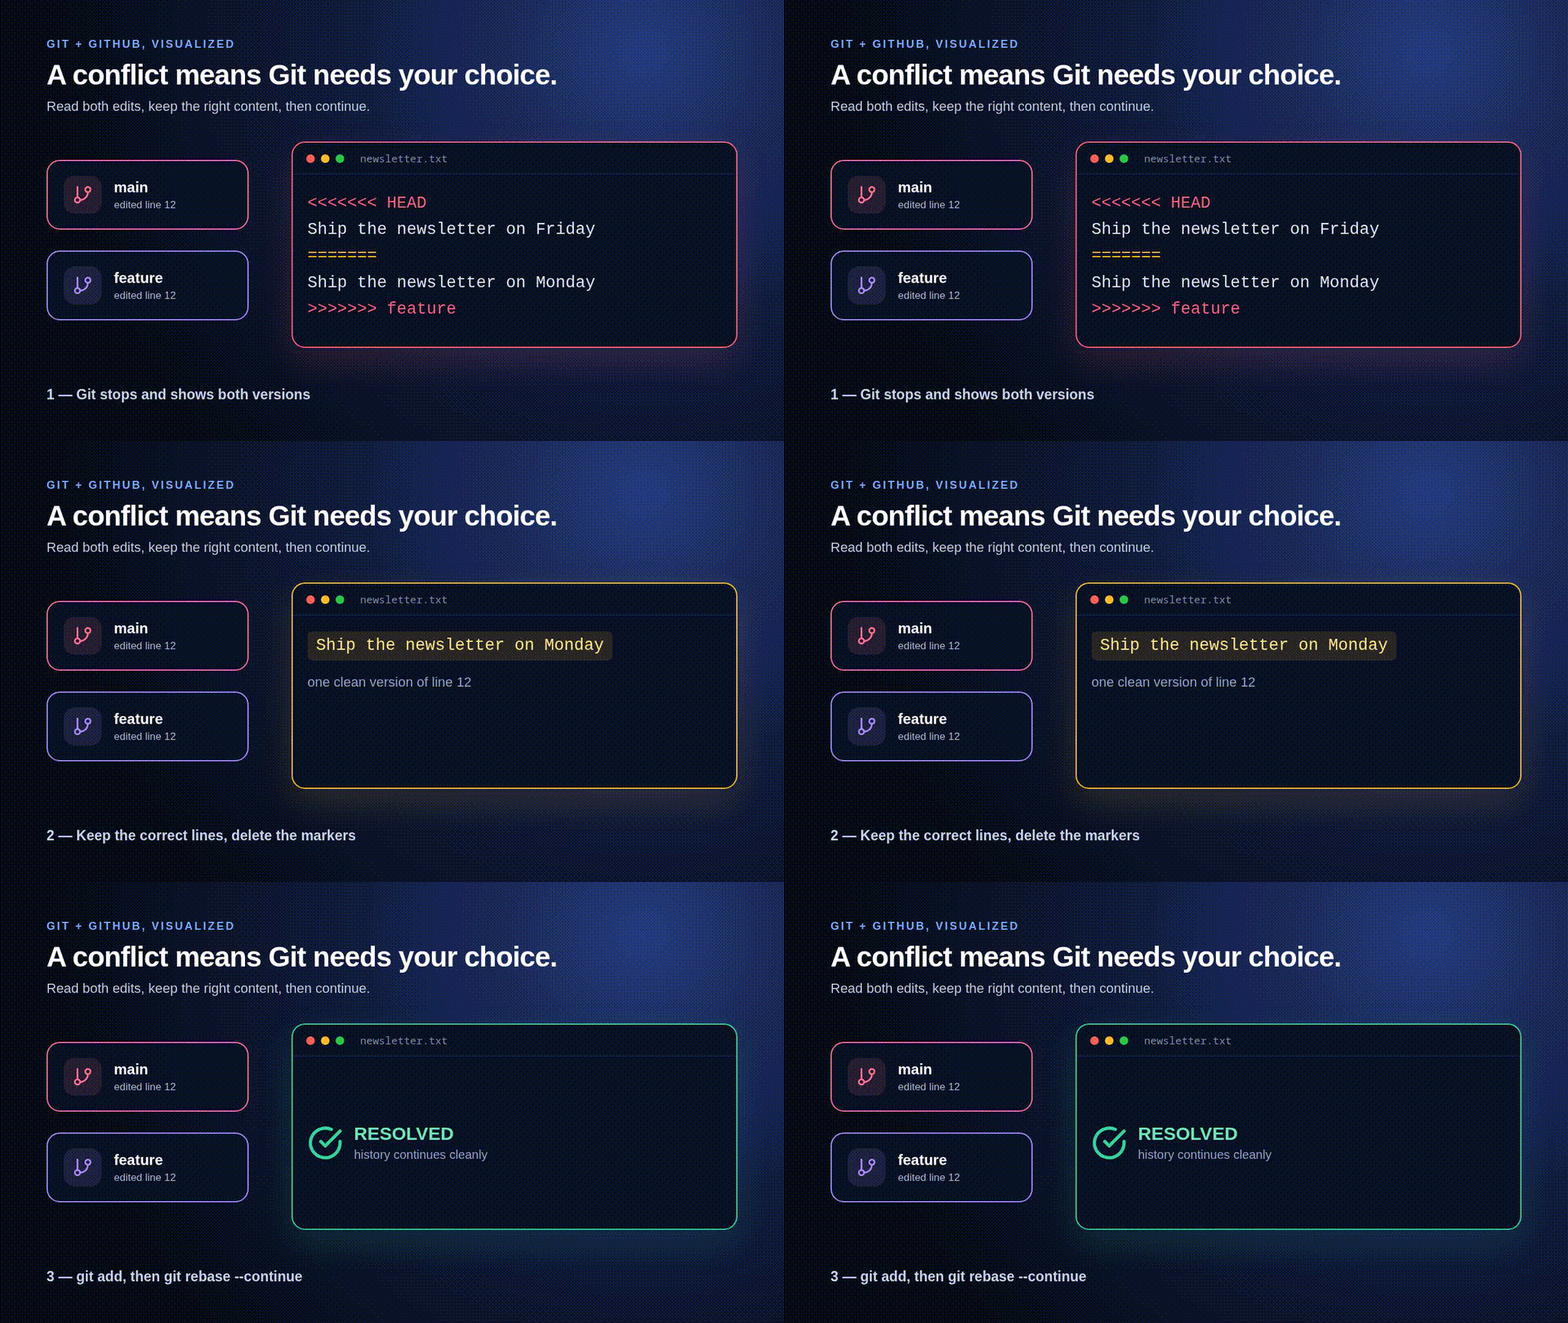
Suppose your branch and main changed the same line in README.md. Run one of the integration commands above. Git pauses and reports a conflict.
Start with:
1git status
2Git names each conflicted file. Open one. You will see markers similar to this:
1<<<<<<< HEAD
2Your branch's version
3=======
4The incoming version
5>>>>>>> origin/main
6The labels can vary, especially during a rebase. The important part is the two alternatives separated by =======.
- Decide the final content. It can use either version, both versions, or a new version.
- Delete every conflict marker:
<<<<<<<,=======, and>>>>>>>. - Save the file and inspect the result.
- Tell Git the conflict is resolved.
For a merge, finish with:
1git add README.md
2git commit
3For a rebase, finish the current replayed commit with:
1git add README.md
2git rebase --continue
3Git may stop again if another commit conflicts. Repeat the same process until it completes.
If you get lost, cancel the operation and return to how the branch looked before it started:
1git merge --abort
2or:
1git rebase --abort
2These commands work only while the respective operation is in progress. They are a reason to pause rather than panic.
Inspect history and changes
These commands answer most "what happened?" questions:
1git status
2git diff
3git log --oneline --graph --decorate --all
4git statusshows the current branch and file state.git diffshows unstaged file changes.git log --oneline --graph --decorate --alldraws a compact view of local and remote branch history.
Run them before a destructive-looking command. They often make the next action obvious.
Recover from common local mistakes
You staged the wrong file
Remove it from the staging area without changing its contents:
1git restore --staged <file-name>
2You want to discard an uncommitted file edit
First read git diff. If you truly do not need the edit:
1git restore <file-name>
2This replaces the file's working copy with the version from the index or current commit. It discards the uncommitted edit, so do not use it for work you might want later.
You want to fix the last commit
Committed with a typo in the message, or forgot a file? Fold the fix into the most recent commit:
1git add forgotten-file.txt
2git commit --amend
3This replaces the last commit with a corrected copy. Do it only while the commit is unpushed — after a push, a shared commit ID suddenly points nowhere, and teammates who based work on it are stuck.
You committed but have not pushed
To change the most recent commit while keeping its changes staged:
1git reset --soft HEAD~1
2Now adjust the files or staging area and make a new commit. Avoid this on a commit you already shared unless you understand the effect on collaborators.
You need to find a lost commit
Git usually keeps references to where HEAD has been. Start with:
1git reflog
2If the commit appears there, create a safety branch at its ID before doing anything else:
1git branch recover-work <commit-id>
2reflog is a powerful recovery tool, but its entries expire eventually. Recover important work promptly and push or back it up once found.
A calm conflict checklist
- Stop and read
git status. - Identify each conflicted file.
- Resolve the content, not only the markers.
- Run your tests or manually check the affected behavior.
- Stage the resolved files.
- Complete or abort the merge/rebase.
- Push the branch and review the pull request diff again.
Conflicts are normal coordination work. A small, focused branch and frequent updates make them smaller and easier to understand.
What you learned
You can now update a branch from main, choose merge or rebase deliberately, resolve conflicts, abort safely, and inspect or recover local history. Those skills cover the Git situations most developers meet every week.